Vue 路由
路由in Vue 用于导航 Vue 应用程序,它发生在客户端(在浏览器中),无需重新加载整个页面,从而带来更快的用户体验。
路由是一种导航方式,类似于我们使用的方式动态组件早些时候。
和路由我们可以使用 URL 地址将某人引导至 Vue 应用程序中的特定位置。
使用动态组件进行导航
为了理解 Vue 中的路由,我们首先看一个使用动态组件在两个组件之间切换的应用程序。
我们可以使用按钮在组件之间切换:
示例
FoodItems.vue:
<template>
    <h1>Food!</h1>
    <p>I like most types of food.</p>
</template>
AnimalCollection.vue:
<template>
    <h1>Animals!</h1>
    <p>I want to learn about at least one new animal every year.</p>
</template>
App.vue:
<template>
  <p>Choose what part of this page you want to see:</p>
  <button @click="activeComp = 'animal-collection'">Animals</button>
  <button @click="activeComp = 'food-items'">Food</button><br>
  <div>
    <component :is="activeComp"></component>
  </div>
</template>

<script>
export default {
  data() {
      return {
        activeComp: ''
      }
    }
}
</script>

<style scoped>
  button {
    padding: 5px;
    margin: 10px;
  }
  div {
    border: dashed black 1px;
    padding: 20px;
    margin: 10px;
    display: inline-block;
  }
</style>
从动态组件到路由
我们使用 Vue 构建 SPA(单页应用程序),这意味着我们的应用程序仅包含一个 *.html 文件。这意味着我们无法引导人们访问其他 *.html 文件来向他们显示我们页面上的不同内容。
在上面的例子中,我们可以在页面上的不同内容之间导航,但是我们不能给其他人一个页面地址,以便他们直接到达有关食物的部分,但是通过路由我们可以做到这一点。
正确设置路由后,如果您使用 URL 地址的扩展名(例如 "/food-items")打开 Vue 应用程序,您将直接进入包含食物内容的部分。
安装 Vue 路由器库
要在计算机上使用 Vue 中的路由,请使用终端在项目文件夹中安装 Vue Router 库:
npm install vue-router@4
更新 main.js
要使用路由,我们必须创建一个路由器,并在 main.js 文件中执行此操作。
main.js:
import { createApp } from 'vue'
import { createRouter, createWebHistory } from 'vue-router'

import App from './App.vue'
import FoodItems from './components/FoodItems.vue'
import AnimalCollection from './components/AnimalCollection.vue'

const router = createRouter({
    history: createWebHistory(),
    routes: [
        { path: '/animals', component: AnimalCollection },
        { path: '/food', component: FoodItems },
    ]
});

const app = createApp(App)

app.use(router);
app.component('food-items', FoodItems);
app.component('animal-collection', AnimalCollection);

app.mount('#app')
添加第 2、8-14 和 18 行以添加路由器功能。
第 19-20 行被删除,因为组件已通过第 11-12 行的路由器包含在内。
我们现在已经创建了一个路由器,例如,如果将“/animals”添加到原始 URL 地址的末尾,则可以打开“AnimalCollection”组件,但直到下一部分我们添加<router-view>成分。路由器还会跟踪网络历史记录,以便您可以使用通常位于网络浏览器左上角 URL 旁边的箭头在历史记录中后退和前进。
使用 <router-view> 组件
要使用新路由器更改页面上的内容,我们需要删除上一个示例中的动态组件并使用<router-view>组件代替。
App.vue:
<template>
  <p>Choose what part of this page you want to see:</p>
  <button @click="activeComp = 'animal-collection'">Animals</button>
  <button @click="activeComp = 'food-items'">Food</button><br>
  <div>
    <router-view></router-view>
    <component :is="activeComp"></component>
  </div>
</template>
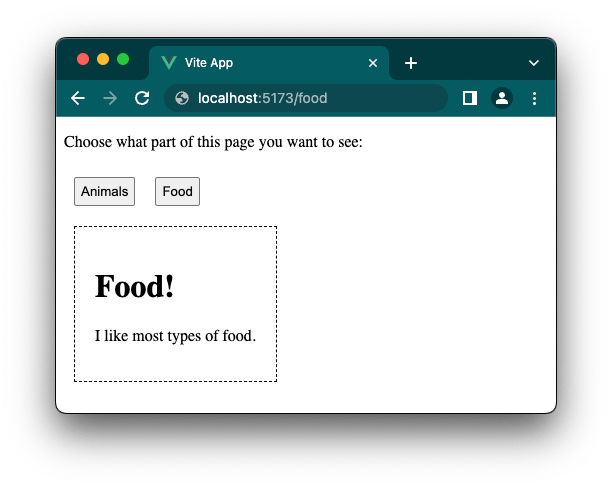
如果您在计算机上完成了上述更改,则可以将“/food”添加到浏览器中项目页面的 URL 地址中,页面应该更新以显示食物内容,如下所示:

使用 <router-link> 组件
我们可以将按钮替换为<router-link>组件,因为它与路由器配合得更好。
我们不再需要“activeComp”数据属性,因此我们可以删除它,并且我们实际上可以删除整个<script>标签,因为它是空的。
App.vue:
<template>
  <p>Choose what part of this page you want to see:</p>
  <router-link to="/animals">Animals</router-link>
  <router-link to="/food">Food</router-link><br>
  <div>
    <router-view></router-view>
  </div>
</template>

<script></script>
<router-link> 组件的样式
这个<router-link>组件被渲染到<a>标签。我们可以看到,如果我们在浏览器中右键单击该元素并检查它:

正如您在上面的屏幕截图中看到的,Vue 还跟踪哪个组件是活动组件,并为活动组件提供“router-link-active”类<router-link>组件(现在呈现为<a>标签)。
我们可以使用上面的信息来提供样式来突出显示<router-link>组件是活动组件:
示例
App.vue:
<template>
  <p>Choose what part of this page you want to see:</p>
  <router-link to="/animals">Animals</router-link>
  <router-link to="/food">Food</router-link><br>
  <div>
    <router-view></router-view>
  </div>
</template>

<style scoped>
  a {
    display: inline-block;
    background-color: black;
    border: solid 1px black;
    color: white;
    padding: 5px;
    margin: 10px;
  }
  a:hover,
  a.router-link-active {
    background-color: rgb(110, 79, 13);
  }
  div {
    border: dashed black 1px;
    padding: 20px;
    margin: 10px;
    display: inline-block;
  }
</style>
笔记:在上面的示例中,URL 地址未更新,但如果您在自己的计算机上执行此操作,则 URL 地址将会更新。即使 URL 地址没有更新,上面的示例也能工作,因为路由是由 Vue 中的路由器在内部处理的。
Vue练习
截取页面反馈部分,让我们更快修复内容!也可以直接跳过填写反馈内容!