Node.js Raspberry Pi GPIO - 流动的 LED
使用带有输出的阵列来创建流动的 LED
在本章中,我们将使用多个 GPIO 引脚,通过按顺序打开和关闭它们来创建 "flowing" 效果。
我们需要什么?
为此,您需要:
笔记:您需要的电阻器可能与我们使用的不同,具体取决于您使用的 LED 类型。大多数小型 LED 仅需要一个小电阻,大约 200-500 欧姆。通常使用的具体值并不重要,但电阻值越小,LED 就会越亮。
单击上面列表中的链接以获取不同组件的说明。
构建电路
现在是时候在我们的面包板上构建电路了。
如果您不熟悉电子产品,我们建议您关闭 Raspberry Pi 的电源。并使用防静电垫或接地带以避免损坏。
使用以下命令正确关闭 Raspberry Pi:
pi@w3demopi:~ $ sudo shutdown -h now
当 Raspberry Pi 上的 LED 停止闪烁后,从 Raspberry Pi 上拔下电源插头(或关闭其连接的电源板)。
仅拔掉插头而不正确关闭可能会导致存储卡损坏。
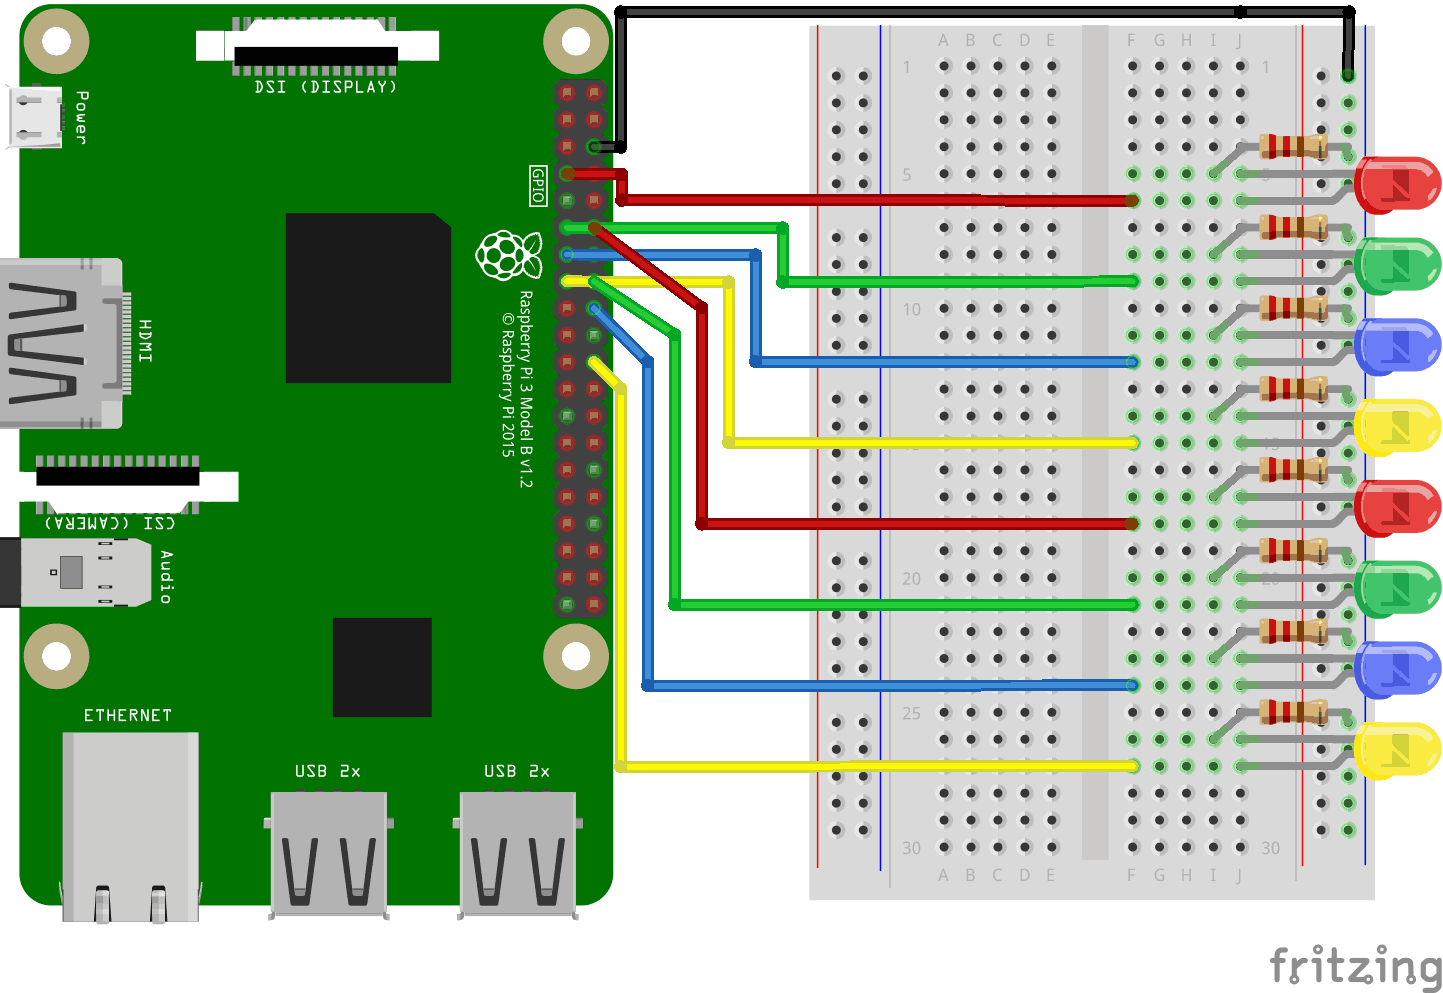
看上面的电路图。
- 在 Raspberry Pi 上,将跳线的母腿连接到接地别针。在我们的示例中,我们使用物理引脚 6(接地,第 3 行,右列)
- 在面包板上,将跳线的公腿连接到接地权力,到地面巴士在右侧。面包板的整列都是连接的,所以哪一行并不重要。在我们的示例中,我们将其附加到第 1 行
- 对于每个 LED:连接 LED,使其连接到 2 个连接点行。在我们的示例中,我们连接:
- LED1 至第 5 行(阴极)和第 6 行(阳极)J 列
- LED2 至第 8 行(阴极)和第 9 行(阳极)J 列
- LED3 至第 11 行(阴极)和第 12 行(阳极)J 列
- LED4 至第 14 行(阴极)和第 15 行(阳极)J 列
- LED5 至第 17 行(阴极)和第 18 行(阳极)J 列
- LED6 至第 20 行(阴极)和第 21 行(阳极)J 列
- LED7 至第 23 行(阴极)和第 24 行(阳极)J 列
- LED8 至第 26 行(阴极)和第 27 行(阳极)J 列
- 对于每个 LED:从 LED 连接 220 欧姆电阻的一个支路地面巴士列在右侧,另一条腿连接到右侧连接点行,在该连接点处连接到 LED 的阴极腿。在我们的示例中,我们连接:
- LED1 至第 5 行第 I 列
- LED2 至第 8 行第 I 列
- LED3 至第 11 行 I 列
- LED4 至第 14 行第 I 列
- LED5 至第 17 行 I 列
- LED6 至第 20 行第 I 列
- LED7 至第 23 行第 I 列
- LED8 至第 26 行第 I 列
- 对于每个 LED:将跳线的母腿连接到通用输入输出接口Raspberry Pi 上的引脚,以及跳线的公腿到右侧连接点行,在此处它连接到 LED 的阳极腿。在我们的示例中,我们连接:
- 来自物理引脚 7 的 LED1(通用输入输出口4,第 4 行,左列)至连接点第 6 行 F 列
- 来自物理引脚 11 的 LED2(通用输入输出口17,第 6 行,左列)至连接点第 9 行 F 列
- 来自物理引脚 13 的 LED3(通用输入输出口27,第 7 行,左列)至连接点第 12 行 F 列
- 来自物理引脚 15 的 LED4(通用输入输出口22,第 8 行,左列)至连接点第 15 行 F 列
- LED5 来自物理引脚 12 (通用输入输出口18,第 6 行,右列)至连接点第 18 行 F 列
- 来自物理引脚 16 的 LED6(通用输入输出口23,第 8 行,右列)至连接点第 21 行 F 列
- 来自物理引脚 18 的 LED7(通用输入输出口24,第 9 行,右列)至连接点第 24 行 F 列
- 来自物理引脚 22 的 LED8(通用输入输出口25,第 11 行,右列)至连接点第 27 行 F 列
您的电路现在应该已经完成,并且您的连接应该与上图非常相似。
现在是时候启动 Raspberry Pi 并编写 Node.js 脚本与其交互了。
Raspberry Pi 和 Node.js 流动 LED 脚本
转到 "nodetest" 目录,然后创建一个名为“flowingleds.js”:
pi@w3demopi:~ $ nano flowingleds.js
该文件现已打开,可以使用内置的 Nano 编辑器进行编辑。
编写或粘贴以下内容:
Flowleds.js
var Gpio = require('onoff').Gpio; //include onoff to interact with the GPIO
var LED04 = new Gpio(4, 'out'), //use declare variables for all the GPIO output pins
LED17 = new Gpio(17, 'out'),
LED27 = new Gpio(27, 'out'),
LED22 = new Gpio(22, 'out'),
LED18 = new Gpio(18, 'out'),
LED23 = new Gpio(23, 'out'),
LED24 = new Gpio(24, 'out'),
LED25 = new Gpio(25, 'out');
//Put all the LED variables in an array
var leds = [LED04, LED17, LED27, LED22, LED18, LED23, LED24, LED25];
var indexCount = 0; //a counter
dir = "up"; //variable for flowing direction
var flowInterval = setInterval(flowingLeds, 100); //run the flowingLeds function every 100ms
function flowingLeds() { //function for flowing Leds
leds.forEach(function(currentValue) { //for each item in array
currentValue.writeSync(0); //turn off LED
});
if (indexCount == 0) dir = "up"; //set flow direction to "up" if the count reaches zero
if (indexCount >= leds.length) dir = "down"; //set flow direction to "down" if the count reaches 7
if (dir == "down") indexCount--; //count downwards if direction is down
leds[indexCount].writeSync(1); //turn on LED that where array index matches count
if (dir == "up") indexCount++ //count upwards if direction is up
};
function unexportOnClose() { //function to run when exiting program
clearInterval(flowInterval); //stop flow interwal
leds.forEach(function(currentValue) { //for each LED
currentValue.writeSync(0); //turn off LED
currentValue.unexport(); //unexport GPIO
});
};
process.on('SIGINT', unexportOnClose); //function to run when user closes using ctrl+cc
按下Ctrl+x保存代码。确认使用 "y",并确认名称使用 "Enter"。
运行代码:
pi@w3demopi:~ $ node flowingleds.js
现在 LED 应该按顺序打开和关闭,产生流动的效果。
结束程序Ctrl+c。